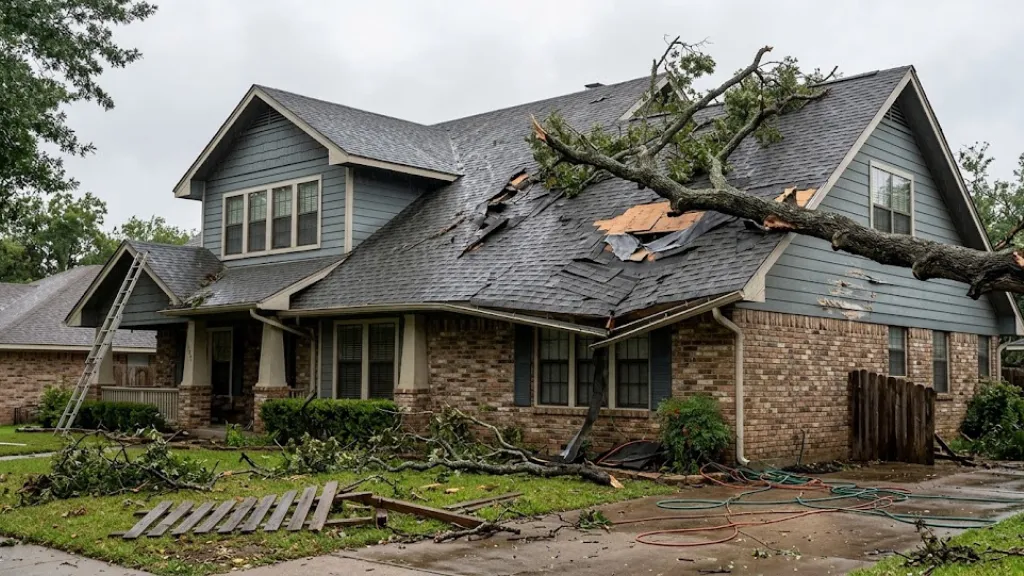
Severe weather events across Will County routinely subject residential and commercial roofs to extreme structural stress. High-velocity straight-line winds, heavy hail impacts, and fallen tree limbs often breach roof coverings, creating immediate pathways for water intrusion. When asphalt shingles tear away or roof decking splits, precipitation driven by strong wind rapidly saturates attic insulation, ceiling drywall, and structural framing. Emergency roof tarping serves as the primary defense against secondary water damage, temporarily sealing compromised roof decks until permanent structural repairs can occur. Executing effective temporary weatherproofing requires understanding physical roof mechanics, proper fastening techniques, and critical safety hazards associated with post-storm structural stabilization.
Meteorological Risk Factors and Roof Envelope Vulnerabilities
Will County properties experience severe weather patterns influenced by open prairie terrain and convective storm systems moving across the Upper Midwest. Spring microbursts and autumn windstorms frequently generate wind gusts exceeding 60 miles per hour, generating immense uplift force along roof perimeters.
Roof edges, rake boards, and ridges suffer the highest aerodynamic lift during severe storms. When wind travels over a roof peak, it creates a negative pressure zone that pulls upward on shingle overhangs. Once an edge shingle lifts, wind enters underneath the roofing assembly, peeling away large sections of asphalt shingles and underlayment. Property owners coordinating immediate weatherproofing through Bolingbrook storm damage restoration services frequently encounter torn rake edges, exposed plywood decking, and damaged soffit vents requiring immediate physical containment.
| Storm Hazard Type | Primary Physical Damage | Secondary Structural Impact | Immediate Mitigation Protocol |
| Straight-Line Winds | Lifted shingle tabs, exposed decking, torn ridge caps | Rain intrusion through nail penetrations and exposed wood | Edge-anchored tarp deployment with perimeter 2×4 batten strips |
| Hail Strikes | Fractured asphalt mats, dislodged granules, dented flashing | Micro-fractures allowing gradual water seepage into sheathing | Full-slope protective membrane coverage over fractured zones |
| Impact from Debris | Punctured rafters, cracked OSB sheathing, broken trusses | Direct open-air water flooding into living areas and attic framing | Structural bracing combined with heavy-duty exterior board-up |
| Ice Damming | Under-shingle backing, lifted eaves, damaged gutters | Sub-surface water pooling into exterior wall cavities | Eave membrane application and temporary drainage channel clearing |
Sub-freezing winter weather introduces secondary failure risks through ice damming. As snow melts on upper roof slopes and refreezes near unheated eaves, expanding ice forces water upward beneath shingle courses. This trapped water saturates OSB sheathing, causing structural timber to swell, weaken, and lose fastener retention.
For structural failures involving breached window openings, garage doors, or low-slope roof sections, coordinating dedicated emergency window board-up in Bolingbrook alongside temporary roofing seals ensures the entire building envelope remains protected against wind-driven precipitation.
Physics and Engineering Principles of Temporary Tarping
Applying a protective tarp involves more than laying plastic over a hole. An improperly installed tarp acts like a sail, catching wind and tearing away from fasteners while causing additional damage to remaining shingles.
A successful emergency tarp installation relies on continuous tension, edge anchoring, and proper water shedding alignment. The tarp must always extend over the roof ridge to prevent water from running underneath the top edge. Fastening requires anchor boards, typically 1×2 or 2×4 lumber, wrapped into the tarp material to distribute fastener tension evenly along the entire edge rather than relying on individual grommets, which pull out easily under wind stress.
- Upper Ridge Anchoring: The top of the tarp must extend over the roof peak by at least two feet and be secured on the non-damaged slope to prevent water from migrating behind the membrane.
- Side Flange Securing: Lateral edges must roll around vertical anchor boards and mount flush against undamaged shingles, creating tight vertical water channels.
- Eave Drainage Extensions: The bottom edge must overhang the roof eave or gutter line, allowing collected runoff to discharge clear of exterior walls.
For properties situated along low-lying agricultural drainage basins or near the Des Plaines River, localized wind patterns can intensify storm damage. Property owners can review official flood maps, watershed management protocols, and building code guidelines through the Will County Land Use Department.
Step-by-Step Technical Tarping Protocol
Executing temporary roof stabilization demands heavy-duty materials and methodical placement. Standard light-duty blue tarps degrade rapidly under solar exposure and tear easily in mild winds. Professional stabilization requires commercial-grade 6-mil or thicker woven polyethylene tarps with heavy UV treatment.
1. Safety Inspection and Area Assessment
Never attempt roof access during active rainfall, high winds, or lightning. Inspect the ground perimeter for downed power lines or low-hanging service drops before placing ladders. Confirm structural integrity from inside the attic space to ensure rafters and ceiling joists have not fractured under heavy impacts.
2. Debris Clearing and Substrate Preparation
Clear loose shingles, tree branches, and hail-damaged debris from the damaged zone. Remove protruding nails or drive them flush into the decking to prevent puncturing the new tarp membrane. Inspect exposed decking for rot or structural soft spots.
3. Sizing and Positioning the Membrane
Measure the damaged zone and add a minimum of three feet on all sides. Position the tarp so it spans completely over the roof peak. Unroll the membrane tightly across the damaged surface, eliminating wrinkles and sag pockets where rainwater could pool.
4. Batten Strip Anchoring Sequence
Wrap the perimeter edges of the tarp around 2×4 or 1×2 wooden anchor strips at least two full turns. Secure these anchor strips directly through the tarp into the roof deck using 3-inch exterior wood screws spaced every 10 to 12 inches.
- Tarp Material Specification: Minimum 6-mil, high-density woven polyethylene with reinforced corners.
- Fastener Requirements: 3-inch sinker nails or heavy-duty exterior deck screws with rubber washers.
- Batten Boarding: Kiln-dried 1×2 or 2×4 spruce-pine-fir (SPF) framing lumber.
5. Sealing Perimeter Anchor Points
Apply polyurethane roof sealant or liquid flash asphalt cement along the top edge of the upper anchor board. This secondary seal prevents driven rain from creeping over the wood strip during heavy downpours.
Where extensive storm impacts destabilize major structural roof decking or masonry gable end walls, utilizing professional roof tarping and board-up in Bolingbrook allows property owners to secure heavy-duty commercial framing and crane-deployed membrane coverage safely.
Critical Fall Hazards and Safety Disclaimer
Walking on a wet, steep, or structurally compromised roof carries severe risk of catastrophic fall injuries. Roof pitch, loose granule hazards, and sudden wind gusts make DIY roof repairs extremely dangerous for untrained individuals.
- Avoid Wet Roof Surfaces: Wet shingles and exposed underlayment act like ice, offering virtually zero shoe traction.
- Watch for Hidden Structural Failure: Punctured or water-logged OSB decking can collapse under human weight, leading to severe falls through ceiling joists.
- Beware Overhead Utility Lines: Metallic ladders, aluminum tools, and wet ropes conduct electricity. Maintain a minimum 10-foot clearance from all overhead power lines.
- Use Certified Fall Protection Equipment: Professional mitigation teams utilize full-body safety harnesses, vertical lifeline ropes, and OSHA-compliant roof anchors. Never step onto a pitched slope without proper fall-arrest systems.
Property owners should prioritize ground-level risk mitigation, interior contents protection, and professional assessment rather than climbing onto damaged roof structures.
Essential Immediate Action Plan for Property Owners
Managing emergency storm recovery effectively requires structured steps immediately following an incident.
- Document the Damage from Ground Level: Photograph exterior roof damage, missing shingles, and fallen trees using camera zoom settings from safe ground locations.
- Mitigate Interior Water Damage: Move furniture, electronics, and valuables away from active ceiling leaks. Place catch basins and plastic sheeting underneath active drips.
- Contact Your Insurance Adjuster: File a formal storm claim promptly. Keep receipts for all temporary stabilization materials and professional emergency services.
- Avoid Walking on Compromised Floors: Saturated drywall ceilings can collapse under water weight. If a interior ceiling bulges downward, carefully puncture a small drainage hole in the center to release trapped water into a bucket.
- Secure Qualified Emergency Stabilization: Connect with independent local specialists who possess commercial rigging gear, ladder stabilizers, and heavy-duty tarping supplies.
Taking immediate, safe action halts secondary ceiling collapse, protects interior finishes, and preserves insurance coverage parameters. When widespread severe weather impacts commercial or residential buildings across the region, connecting with an established emergency storm damage restoration network connects property owners with independent local professionals equipped to stabilize compromised roof structures safely.